PIC Tutorial - RS232 Board
RS232 Board

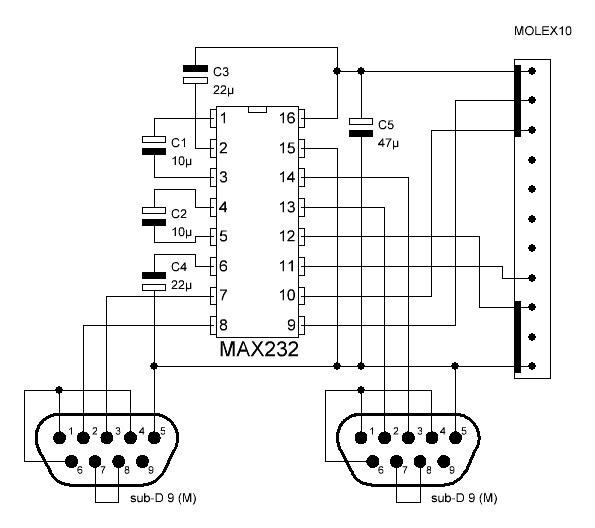
![]() This
is the RS232 board, it uses a MAX232 5V to RS232 converter chip, this
converts the 0-5V TTL levels at the PIC pins to the +12V/-12V levels used
in RS232 links. As is common with these devices it inverts the data during
the conversion, the PIC USART hardware is designed to take account
of this - but for software serial communications you need to make sure
that you invert both the incoming and outgoing data bits.
This
is the RS232 board, it uses a MAX232 5V to RS232 converter chip, this
converts the 0-5V TTL levels at the PIC pins to the +12V/-12V levels used
in RS232 links. As is common with these devices it inverts the data during
the conversion, the PIC USART hardware is designed to take account
of this - but for software serial communications you need to make sure
that you invert both the incoming and outgoing data bits.
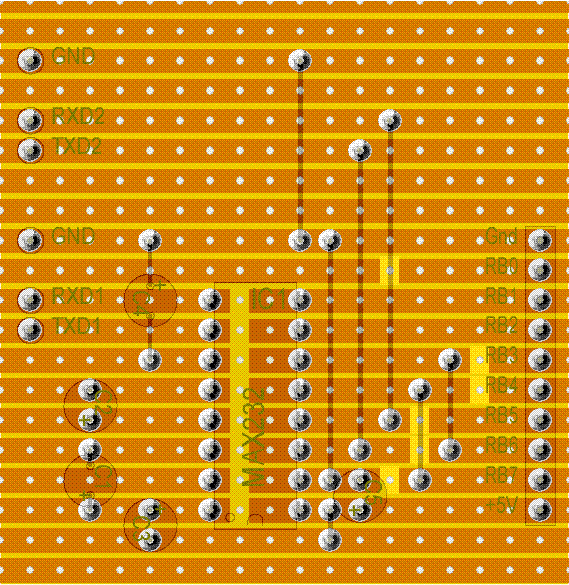
![]() The
top
two jumpers (Jmp1 and Jmp2) on the RB7 and RB6 lines are for connection to the 16F876
board (the 16F876 uses RC6 and RC7 for it's USART connection), and the
tracks should be cut feeding RB1 and RB2, as in the third graphic below. The
bottom two jumpers (Jmp3 and Jmp4) on the RB1 and RB2 lines are for the 16F628 board (the 16F628 uses
RB1 and RB2 for it's USART connection), and the tracks should be cut
feeding RB6 and RB7, as in the second graphic below.
The
top
two jumpers (Jmp1 and Jmp2) on the RB7 and RB6 lines are for connection to the 16F876
board (the 16F876 uses RC6 and RC7 for it's USART connection), and the
tracks should be cut feeding RB1 and RB2, as in the third graphic below. The
bottom two jumpers (Jmp3 and Jmp4) on the RB1 and RB2 lines are for the 16F628 board (the 16F628 uses
RB1 and RB2 for it's USART connection), and the tracks should be cut
feeding RB6 and RB7, as in the second graphic below.
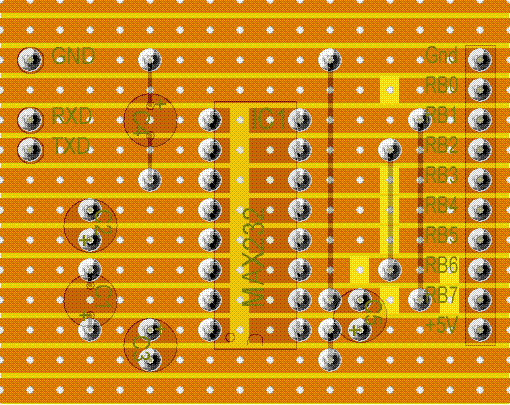
![]() So,
for use with the 16F876 board cut the two tracks shown to RB1 and RB2, for the 16F628
cut the two tracks RB6 and RB7. This only applies if you are using the
hardware USART, for software serial communications you can use any pins
you like.
So,
for use with the 16F876 board cut the two tracks shown to RB1 and RB2, for the 16F628
cut the two tracks RB6 and RB7. This only applies if you are using the
hardware USART, for software serial communications you can use any pins
you like.
![]() Although it's labelled as connecting to
PortC for the 16F876 processor board (and is also designed to connect to
PortB for the 16F628 processor board), as
with most of the boards, it can also be
connected to other ports if required, and if not using the hardware USART.
Although it's labelled as connecting to
PortC for the 16F876 processor board (and is also designed to connect to
PortB for the 16F628 processor board), as
with most of the boards, it can also be
connected to other ports if required, and if not using the hardware USART.
 |
|
 |
|
 |
|
Double RS232 Board |
||||
 This is an updated RS232 board, it uses both halves of the MAX232 to give two serial ports, one in hardware, and one in software, it's essentially the same as the previous board, just expanded slightly. |
||||
|